
快速构建insightface的demo
前言
最近还报名了一个AI嵌入式的小项目,自己玩玩吧。和insightface的内容相关。
操作
步骤 1:环境准备
安装必要的软件和工具:
- 确保系统安装了以下工具:
- Python (建议 3.8 以上)
- CUDA (如使用 GPU 加速)
- pip 或 conda 包管理工具
- 如果没有 GPU,也可以使用 CPU,但速度会慢。
- 确保系统安装了以下工具:
克隆 InsightFace 项目代码:
git clone https://github.com/deepinsight/insightface.git
cd insightface
创建虚拟环境并安装依赖:
使用
pip或conda安装依赖:# 创建虚拟环境并指定版本
conda create -n insightface python=3.9
# 激活虚拟环境
conda activate insightface
# 安装所需依赖
pip install -r requirements.txt安装 PyTorch(或 MXNet):
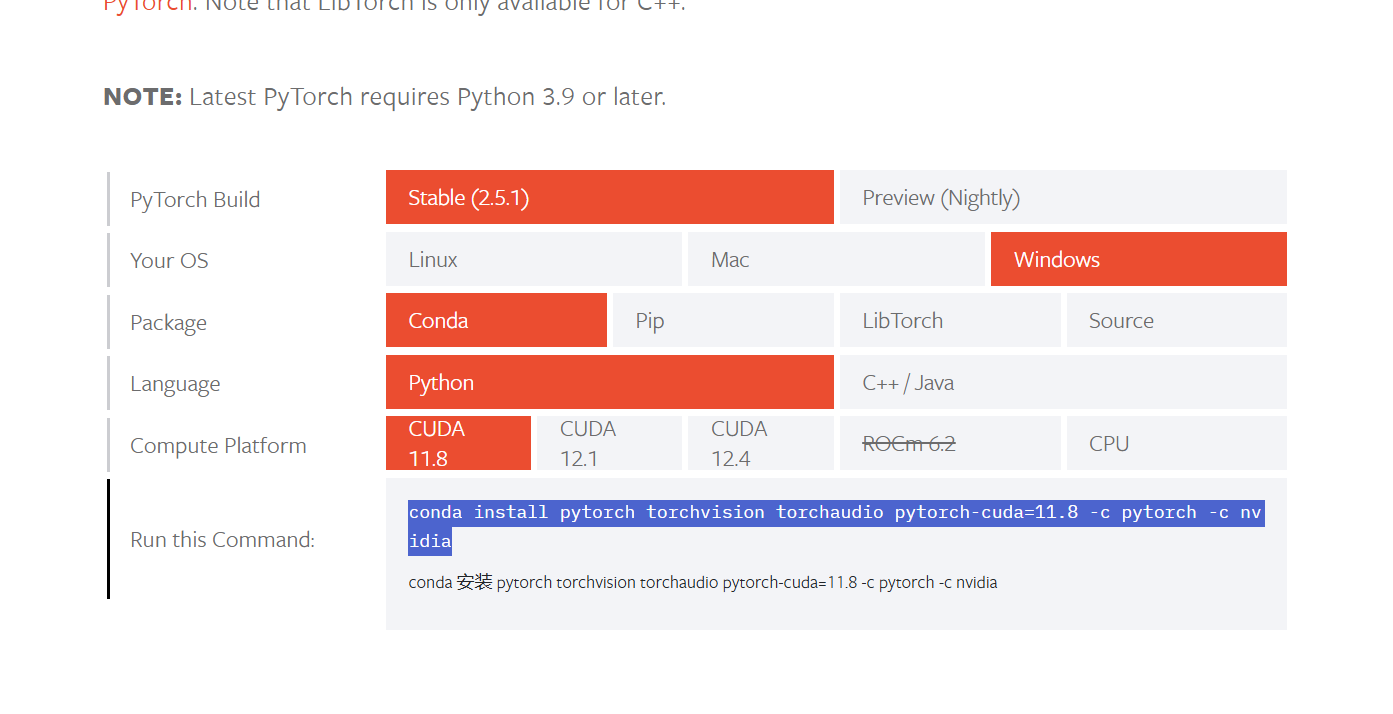 去官网查询,找到对应的版本,复制链接下载
conda install pytorch torchvision torchaudio pytorch-cuda=11.8 -c pytorch -c nvidia

4. **下载预训练模型:**

   - InsightFace 提供了人脸检测 (RetinaFace) 和识别 (ArcFace) 的预训练模型。

   - 下载模型:
     - RetinaFace: https://github.com/deepinsight/insightface/tree/master/detection/retinaface
     - ArcFace 模型库:https://github.com/deepinsight/insightface/tree/master/recognition

   - 确保模型文件存储在正确的路径,或自行调整路径。


---

### **步骤 2:快速搭建 Demo**

1. **Demo 脚本结构:**
   - **功能**:加载一张图片,进行人脸检测,然后识别或提取人脸特征。
   - 以下代码展示了一个简单的实现:

   ```python
   import cv2
   import numpy as np
   from insightface.app import FaceAnalysis

   # 1. 初始化人脸分析模型
   def init_insightface():
       app = FaceAnalysis(name="buffalo_l")  # 使用 InsightFace 提供的预训练模型
       app.prepare(ctx_id=0, det_size=(640, 640))  # ctx_id=0 表示使用 GPU,-1 表示 CPU
       return app

   # 2. 人脸检测与特征提取
   def process_image(app, img_path):
       # 加载图片
       img = cv2.imread(img_path)
       if img is None:
           print("无法加载图片,请检查路径")
           return

       # 检测人脸
       faces = app.get(img)
       if not faces:
           print("未检测到人脸")
           return

       # 绘制检测结果
       for face in faces:
           box = face.bbox.astype(int)
           cv2.rectangle(img, (box[0], box[1]), (box[2], box[3]), (255, 0, 0), 2)
           print("人脸特征向量:", face.normed_embedding)  # 打印特征向量

       # 显示结果
       cv2.imshow("Detected Faces", img)
       cv2.waitKey(0)
       cv2.destroyAllWindows()

   if __name__ == "__main__":
       # 初始化
       app = init_insightface()

       # 输入图片路径
       img_path = "your_image_path.jpg"  # 替换为你的图片路径
       process_image(app, img_path)
代码说明:
FaceAnalysis是 InsightFace 的核心模块,支持人脸检测和特征提取。ctx_id设置为0时,使用 GPU 加速;设置为-1时,使用 CPU。- 检测到的人脸可以通过
bbox提取位置,normed_embedding提取特征向量。
步骤 3:运行 Demo
- 确保图片路径正确,例如
img_path = "test.jpg"。 - 运行脚本:
python demo.py
- 成功运行后,程序将显示检测到的人脸,并在终端输出人脸的特征向量。
步骤 4:扩展功能
在 Demo 基础上,可以尝试添加更多功能:
实时摄像头检测:
- 替换图片加载部分,改为调用摄像头:
cap = cv2.VideoCapture(0)
while True:
    ret, frame = cap.read()
    if not ret:
        break
    faces = app.get(frame)
    # ...绘制检测结果
    cv2.imshow("Real-Time Detection", frame)
    if cv2.waitKey(1) & 0xFF == ord('q'):
        break
cap.release()
cv2.destroyAllWindows()
- 替换图片加载部分,改为调用摄像头:
人脸匹配(比对):
- 对两张图片提取特征向量,计算余弦相似度判断是否为同一人:
from scipy.spatial.distance import cosine

embedding1 = face1.normed_embedding
embedding2 = face2.normed_embedding
similarity = 1 - cosine(embedding1, embedding2)
print(f"相似度:{similarity}")
- 对两张图片提取特征向量,计算余弦相似度判断是否为同一人:
批量处理:
- 加载文件夹中的多张图片,循环处理。
模型优化:
- 根据实际需求,使用量化模型或裁剪模型以提升性能。
步骤 5:参考文档与资源
本博客所有文章除特别声明外,均采用 CC BY-NC-SA 4.0 许可协议。转载请注明来自 Peter-JiY's Blog!
评论